Whats new in Final Cut Pro
Wednesday, August 26, 2020 1:17 PM
Create square or vertical versions of a project in Final Cut Pro
Popular social media platforms and websites allow for (and sometimes require) video clips with a variety of aspect ratios—such as square or vertical—for playback in an app or on the web. A relatively new post-production task is creating multiple versions of a project with different aspect ratios.
With Final Cut Pro, you can repurpose projects that have standard horizontal aspect ratios, such as those for film or TV, to create deliverables in all shapes and sizes, including square or vertical.
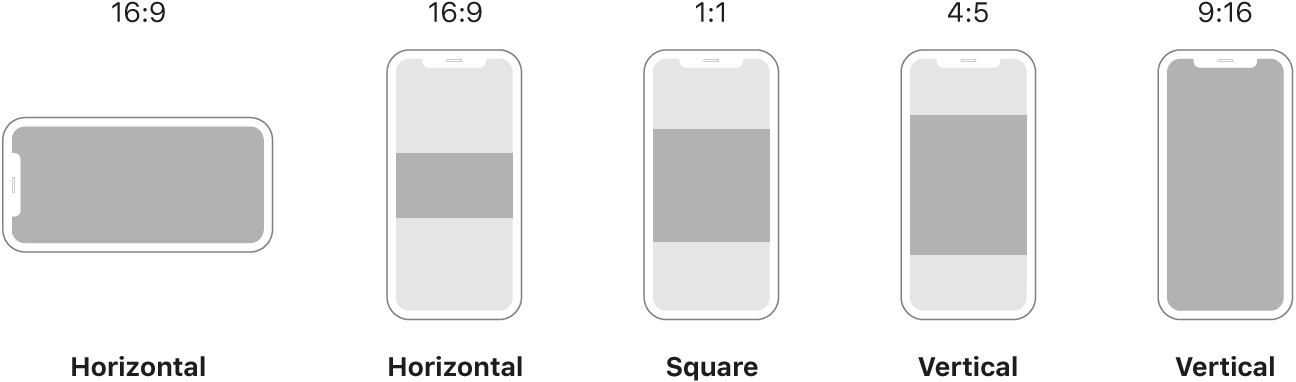
In the past, reframing each clip in a project for a new aspect ratio was a manual and time-consuming process. Final Cut Pro now speeds up this process with the Smart Conform feature, which analyzes the content of each clip for faces or other areas of visual interest, and automatically reframes clips that have a different aspect ratio from the project aspect ratio. You can use Smart Conform to quickly create a square or vertical version of a horizontal or widescreen project, and then make manual framing adjustments later.
In Final Cut Pro, open an existing horizontal project.
Select the project in the browser, and do one of the following:
Choose Edit > Duplicate Project As.
Control-click the project in the browser, and choose Duplicate Project As.
In the window that appears, enter a project name and specify the settings for the duplicate project. (Choose Vertical or Square from the Video Format pop-up menu.)
When you change the aspect ratio, the Smart Conform checkbox appears.
To have Final Cut Pro analyze clips in the project and automatically reframe the clips whose aspect ratio differs from the project aspect ratio, select the Smart Conform checkbox.
Click OK.
Final Cut Pro creates the new project.
If you selected Smart Conform, Final Cut Pro enables overscan view for reframed clips, revealing areas of a clip that extend beyond the edge of the viewer. You can make further reframing adjustments manually using the Transform effect. See Resize, move, and rotate clips in Final Cut Pro.
You can add a custom overlay as an onscreen guide when placing text and graphics in the frame. Custom overlays are similar to title-safe and action-safe overlays, except that they can be customized to the needs of your project. This makes them useful for the various vertical and square aspect ratios common in social media. See Show overlays in the Final Cut Pro viewer.
See alsoIntro to analyzing media in Final Cut Pro
Create a proxy-only project in Final Cut Pro
You can create proxy-only versions of your projects, events, and libraries for portability and performance. The proxy-only versions contain only proxy media files, along with file types that don’t support proxy media, such as audio, video with an alpha channel, and still images.
Proxy-only projects are useful for offline editing. Video proxy files use considerably less storage space, often enough to allow you to work on a portable computer instead of a desktop computer with significantly more memory and processing power.
The following instructions are for making a proxy-only version of a project, but they apply equally to making proxy-only events and proxy-only libraries.
In the Libraries sidebar in Final Cut Pro, select the event that contains your project.
In the browser, select the project, then choose File > Transcode Media and create proxy files for your project.
Note: To make a proxy-only version of an event or a library, select it in the Libraries sidebar.
With the project still selected in the browser, choose File > Copy [item] to Library > New Library.
Enter a name for the new library, choose a location for it, and click Save.
In the window that appears, select Media in the Include section, then select the “Proxy media” checkbox.
Click the Media Destination pop-up menu and choose a location for the new library, then click OK.
For more information about setting the library storage location, see Set storage locations in Final Cut Pro.
Final Cut Pro copies the item you selected and its proxy files to the new library’s storage location, and the new library appears in the Libraries sidebar.
Note: File types that don’t support proxy media (audio, video with an alpha channel, and still images) are copied to the new library’s storage location in their original format.
Open the project in the new library.
Click the View pop-up menu in the upper-right corner of the viewer, and choose either Proxy Only or Proxy Preferred in the Media Playback section.
Missing File alert icons may appear in the browser, timeline, and viewer if Media Playback is set to Optimized/Original. See Control playback quality in Final Cut Pro.
You can return a proxy-only project to the original library and reunite it with its original or optimized media.
In the Final Cut Pro browser, rename the proxy-only project (to distinguish it from the original project), then drag it to an event in the original library.
In the window that appears, select “Project without media” in the Include section.
Note: If you added new media to the project and want the new media to be copied to the original library, select Media in the Include section, then select the “Original media” checkbox.
A copy of the project appears in the event, automatically connected to the relevant original or optimized media.
Adjust ProRes RAW camera settings in Final Cut Pro
Apple ProRes RAW brings to raw video the same great performance, quality, and ease of use that Apple ProRes has brought to conventional video, in a format ideal for high-dynamic-range (HDR) content creation. ProRes RAW captures most of the sensor data from compatible cameras. This wealth of data allows you to flexibly adjust exposure and white balance in Final Cut Pro without losing any quality.
You can view and adjust the ISO setting, exposure offset, and color temperature of ProRes RAW media using controls in the inspector.
Import one or more compatible Apple ProRes RAW clips.
In the Final Cut Pro browser or timeline, select the clip or clips you want to inspect or adjust.
Note: Compound clips cannot be adjusted.
Do one of the following:
Choose Window > Show in Workspace > Inspector (or press Command-4).
Click the Inspector button in the toolbar.

Click the Info button at the top of the inspector.

Click the Metadata View pop-up menu in the bottom-left corner of the Info inspector and choose Settings.

In the Info inspector, view or adjust any of the following settings:
Note: These settings appear only if the corresponding information is found in the clip metadata.
Camera ISO: Displays the as-shot ISO setting of ProRes RAW clips. Not adjustable.
ISO: Adjusts the ISO setting of ProRes RAW clips.
Exposure Offset: Adjusts the ISO setting of ProRes RAW clips up or down by as much as one stop.
Camera Color Temperature: Displays the as-shot color temperature of ProRes RAW clips. Not adjustable.
Temperature: Adjusts the color temperature of ProRes RAW clips. This slider is available only for clips shot with supported cameras.
For information about cameras that are compatible with Apple ProRes RAW, see this Apple Support article.
Fade audio in and out in Final Cut Pro
There are several ways to create audio fade-ins and fade-outs on the audio portions of clips or on audio components in Final Cut Pro:
Apply fades using the Modify menu: You can quickly apply fade-ins and fade-outs to selected clips or audio components from the Modify menu. You can change the default fade duration in Final Cut Pro preferences.
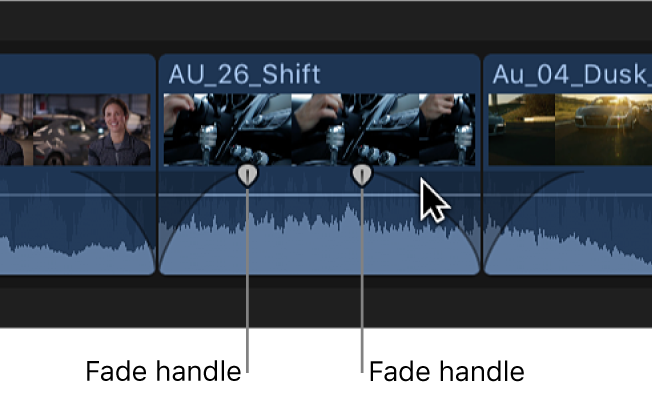
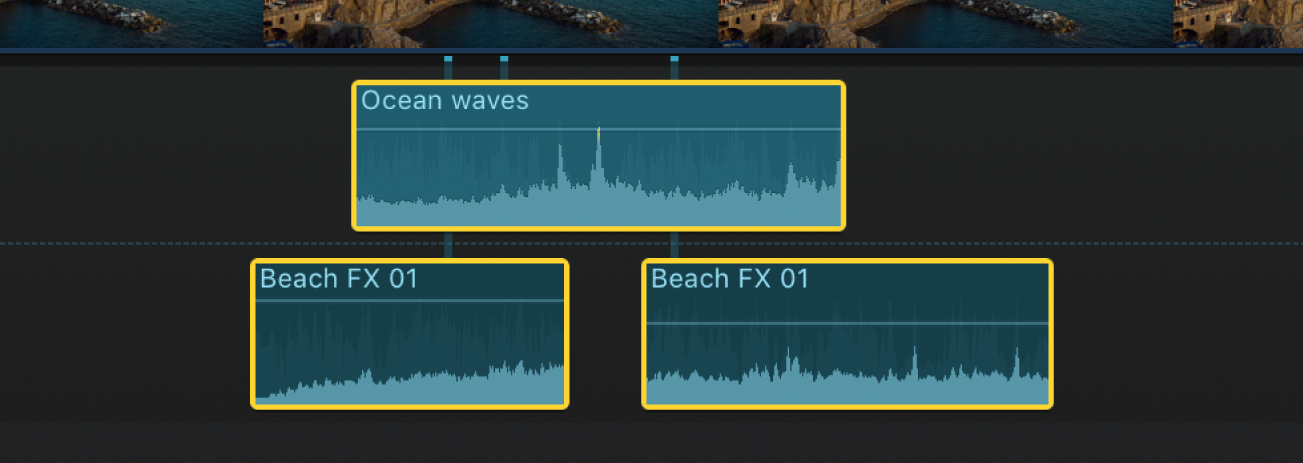
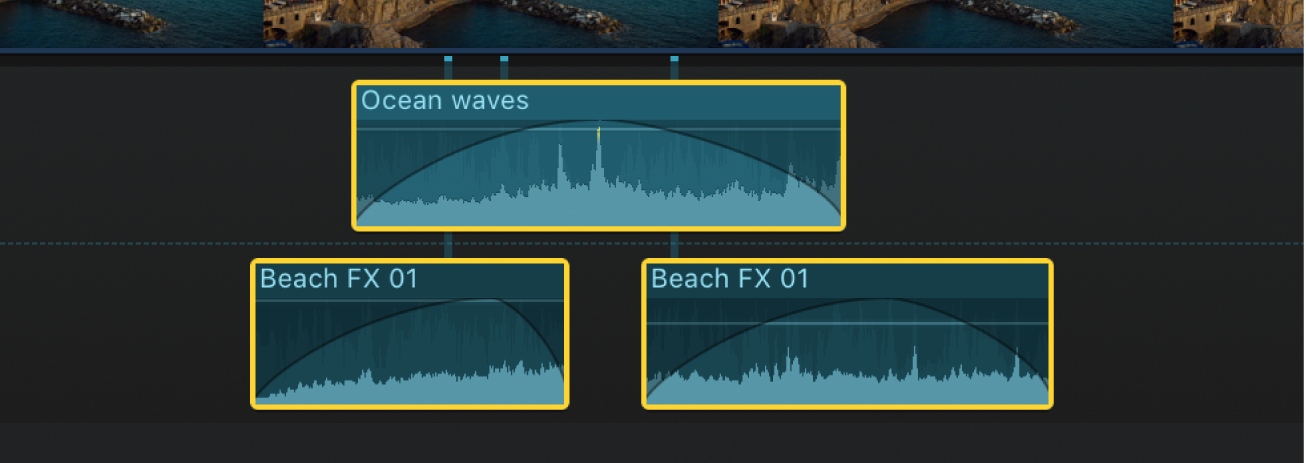
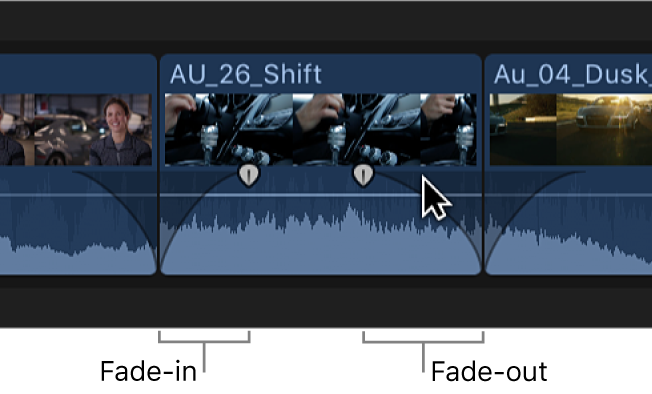
Create fades using fade handles: You can use fade handles to create manual fade-ins and fade-outs on the audio portion of a clip or an audio component in the timeline. Fade handles appear in the top-left and top-right corners of the audio waveform when you place the pointer over the clip.
You can also change the fade’s shape by choosing one of several predefined options. Changing the fade shape changes the sound of the fade.
Note: Fades created using fade handles override crossfades created by a transition. For information about crossfades, see Crossfade audio in Final Cut Pro.
In the Final Cut Pro timeline, select one or more audio clips or video clips with audio.
Do one of the following:
Choose Modify > Adjust Audio Fades > Apply Fades.
Fades appear at the beginning and end of the selected clip or clips.
Note: If you select a clip that already has a fade, the Apply Fades command does not override it.
Choose Modify > Adjust Audio Fades > Fade In.
If there are no preexisting fades at the beginning of the selected clip or clips, fades appear at the beginning of the clips. If there are already fades at the beginning of the selected clip or clips, they are removed.
Choose Modify > Adjust Audio Fades > Fade Out.
If there are no preexisting fades at the end of the selected clip or clips, fades appear at the end of the clips. If there are already fades at the end of the selected clip or clips, they are removed.
To adjust the duration of a fade, drag the fade handle to the point where you want the fade to begin or end.
The default duration for fades is one half-second. To change the default duration, see Editing preferences in Final Cut Pro.
Tip: You can use the Command Editor to assign a keyboard shortcut to apply (or remove) only a fade-in or a fade-out. See Intro to the Command Editor in Final Cut Pro.
In the Final Cut Pro timeline, drag the fade handle to the point in the clip where you want the fade to begin or end.
Fade handles from the beginning of a clip create a fade-in, and fade handles at the end of a clip create a fade-out.
Fades complement any volume adjustments you’ve already made to a clip. For example, if you previously adjusted the volume lower at the beginning of a clip, the fade-in increases the volume from silence (–∞ dB) to the level you’ve already specified.
In the Final Cut Pro timeline, Control-click a fade handle and choose a fade option:

Linear: Maintains a constant rate of change over the length of the fade.
S-curve: Eases in and out of the fade with the midpoint at 0 dB.
+3dB: Starts slowly and then moves quickly toward the end. This is the default setting and is best for maintaining a natural volume when crossfading between two clips.
–3dB: Starts quickly and then slowly tapers off toward the end.
In the Final Cut Pro timeline, select one or more audio clips or video clips with audio.
Do one of the following:
Choose Modify > Adjust Audio Fades > Remove Fades.
Fades are removed from the beginning and end of the selected clip or clips.
Choose Modify > Adjust Audio Fades > Fade In.
If there are preexisting fades at the beginning of the selected clip or clips, they are removed. If there are no fades at the beginning of the selected clip or clips, fades appear at the beginning of the clips.
Choose Modify > Adjust Audio Fades > Fade Out.
If there are preexisting fades at the end of the selected clip or clips, they are removed. If there are no fades at the end of the selected clip or clips, fades appear at the end of the clips.